veertu ubuntu 2016-06-12.png
This page contains an uploaded file:

No summary was provided for this file.
This page contains an uploaded file:
No summary was provided for this file.
This page contains an uploaded file:

No summary was provided for this file.
This page contains an uploaded file:

No summary was provided for this file.
This page contains an uploaded file:

No summary was provided for this file.
This page contains an uploaded file:

No summary was provided for this file.
I've been using Firefox on a late 2016 MacBook Pro, running macOS 10.12.2. Every time the laptop wakes from sleep, Firefox has crashed. To remedy this situation, I've created a Hammerspoon script to kill Firefox when the system goes to sleep, and start it upon waking. In Firefox Preferences -> General, you can configure a setting called "When Firefox starts". Set this to "Show my windows and tabs from last time". Then install Hammerspoon, create the folder .hammerspoon in your home directory and create the file init.lua in that new folder. Then paste the following code and in Hammerspoon, reload the configuration.
local log = hs.logger.new('mywatcher','debug') function callback(eventType)
if (eventType == hs.caffeinate.watcher.systemWillSleep) then
local firefox = hs.application.find('Firefox')
if not (firefox == nil) then
firefox:kill()
end
elseif (eventType == hs.caffeinate.watcher.systemDidWake) then
local firefox = hs.application.find('Firefox')
if (firefox == nil) then
firefox = hs.application.open("/Applications/Firefox.app")
end
end
end local mywatcher = hs.caffeinate.watcher.new(callback)
mywatcher:start()
log.i("Started")To have Firefox look a little more at home on macOS, check out the following addons:
I've also noticed that Firefox 50.0.2 sometimes crashes when disconnecting the external monitor from my 2016 MacBook Pro. After restarting, it brings up the Restore Session screen with the "Well this is embarrassing" message. To turn this off, go to about:config, search for resume_from and double-click on the value browser.sessionstore.resume_from_crash so it's set to false.
I've heard the figure that every four hours, a new coworking space is created. Personally, I've got a permanent desk in a coworking space, which allows me to put down a decent monitor, some personal stuff, a USB hub with a decent keyboard and mouse, et cetera. If you're also looking for a nice (semi-)permanent desk somewhere, here's a list of questions to get a feel of the place:
Be sure to write down these answers. I've had the unfortunate situation where an office manager would give me a room next to a studio, and forgot to mention this. Luckily a desk was available in another coworking room.
What got me confused today, was how to play with AutoLayout in a Playground. The trick is to first create a main view, akin to the view in a View Controller, that is sized with a frame (without constraints).
After that's set up, add subviews that use AutoLayout. The following works for Xcode 8.1:
import UIKit
    let view = UIView(frame: CGRect(x: 0, y: 0, width: 500, height: 500))
    view.backgroundColor = UIColor.white
    view.layer.borderWidth = 2.0
let licensePlateView = UIView()
licensePlateView.translatesAutoresizingMaskIntoConstraints = false
licensePlateView.backgroundColor = UIColor.gray
view.addSubview(licensePlateView) licensePlateView.leadingAnchor.constraint(equalTo: view.leadingAnchor).isActive = true
licensePlateView.topAnchor.constraint(equalTo: view.topAnchor).isActive = true
licensePlateView.widthAnchor.constraint(equalToConstant: 200).isActive = true
licensePlateView.heightAnchor.constraint(equalToConstant: 50).isActive = true view.layoutIfNeeded()
viewScreenshot:

My favorite virtualization software Veertu has been open sourced! Check out their blog entry: https://veertu.com/usb-bridged-networking-support/
Version 1.2.90 is now available from their website, or via Brew Cask:
$ brew cask install veertu-desktop
Nice site that graphically shows the options for UIStackView distribution and alignment:
https://www.raizlabs.com/dev/2016/04/uistackview/
Very interesting because a stackview can replace a lot of manual layouts.
After seeing Apple coming out with new 13" and 15" machines with only USB-C connections, I wondered whether there are mice with USB-C. This could be a choice when you don't want or can't use Bluetooth due to preference, regulations or interference. I was very surprised that it's very slim pickings. Big brands like Logitech haven't gotten around to those, and the only one I've been able to find is this one:
http://www.trust.com/en/product/20969-usb-c-retractable-mini-mouse-black
Currently I'm unable to find keyboards with USB-C, so a good option is to get one of those keyboards with a detachable cable and simply replace it with a USB-C cable. The CoolerMaster keyboards usually (all?) have detachable cables.
To compare floats to zero, or each other, use the following functions:
    func fequal(_ a: Double, _ b: Double) -> Bool {
        return fabs(a - b) < DBL_EPSILON
    }
func fequal(_ a: Float, _ b: Float) -> Bool {
return fabs(a - b) < FLT_EPSILON
} func fequal(_ a: CGFloat, _ b: CGFloat) -> Bool {
return fabs(a - b) < CGFloat(FLT_EPSILON)
} func fequalzero(_ a: Double) -> Bool {
return fabs(a) < DBL_EPSILON
} func fequalzero(_ a: Float) -> Bool {
return fabs(a) < FLT_EPSILON
} func fequalzero(_ a: CGFloat) -> Bool {
return fabs(a) < CGFloat(FLT_EPSILON)
}To test, paste the above and the below code in a playground:
    var a: Double = 0.1
    var b: Double = 0.2
    var c: Double = 0.3
    let d = a + b
if c == d {
print("Equal!")
} else {
print("Not equal")
} if fequal(c, d) {
print("Equal!")
} else {
print("Not equal")
}This is how you walk through a string in Swift 3:
    let str = "Hello, playground"
    let stepsize = 3
    let len = str.characters.count
for start in stride(from: 0, to: len, by: stepsize) {
var end = start + stepsize
if end > len {
end = len
}
let startIndex = str.index(str.startIndex, offsetBy: start)
let endIndex = str.index(str.startIndex, offsetBy: end) print("From \(start) to \(end)")
print(str[startIndex..<endIndex])
}Note: not optimized in any way.
Swift 3 is different from version 2 in the naming department. The short version is that the first label of a function is now mandatory, and that the function signature should reflect this.
Old:
func pageViewsfromContent(content: ENFormContent) -> [VIFormPageView]
New:
func pageViews(fromContent content: ENFormContent) -> [VIFormPageView]
See also: https://swift.org/documentation/api-design-guidelines/
Today, I've transitioned a project to Swift 3 and I bumped into a crash. The crash was as follows:
    -[_SwiftValue nsli_superitem]: unrecognized selector sent to instance 0x170249a50
    *** Terminating app due to uncaught exception 'NSInvalidArgumentException', reason: '-[_SwiftValue nsli_superitem]: unrecognized selector sent to instance 0x170249a50'
    *** First throw call stack:
    (0x1816741c0 0x1800ac55c 0x18167b278 0x181678278 0x18157259c 0x1820ab104 0x1820a9948 0x1820a879c 0x1820a8340 0x100176cc0 0x10012071c 0x100123474 0x1874b55c8 0x1874cd15c 0x1876556ac 0x18756dd74 0x18756d9dc 0x18756d940 0x1874b2738 0x18497b40c 0x1849700e8 0x18496ffa8 0x1848ecc64 0x1849140d0 0x1874a7e08 0x1816217dc 0x18161f40c 0x18161f89c 0x18154e048 0x182fd1198 0x187520818 0x18751b550 0x10002387c 0x1805305b8)
    libc++abi.dylib: terminating with uncaught exception of type NSException
Turns out this happens at the end of the following bit of code:
 scrollView = UIScrollView()
    scrollView.translatesAutoresizingMaskIntoConstraints = false
    self.view.addSubview(scrollView)
contentView = UIView()
contentView.translatesAutoresizingMaskIntoConstraints = false
scrollView.addSubview(contentView) let viewDict = [
"contentView": contentView,
"scrollView": scrollView,
] let vFormat = "V:|[contentView]|"
let constraints = NSLayoutConstraint.constraints(withVisualFormat: vFormat, options: [], metrics: nil, views: viewDict)Yeah, I've been creating UIView objects by hand instead of using Interface Builder. Like a savage! After playing with the debugger, it turns out the compiler infers the type of the viewDict as a [String: UIView?] and do notice that UIView optional.
The problem is fixed by declaring the viewDict as follows:
let viewDict: [String: UIView] = .....
Just leaving this here for DuckDuckGo, plus I've answered a similar question on StackOverflow.
Here's a bit of code that you can throw in a playground. Given an array with a bunch of objects, it'll filter the array based on a property. Then it'll print the result.
    class MyObj: CustomStringConvertible {
        var enabled = true
        var text = ""

        init(enabled: Bool, text: String) {
            self.enabled = enabled
            self.text = text
        }

        var description: String {
            return "MyObj=\(text)"
        }
    }
let collection = [
MyObj(enabled: true, text: "ja"),
MyObj(enabled: true, text: "jawohl"),
MyObj(enabled: false, text: "no"),
MyObj(enabled: false, text: "nope"),
MyObj(enabled: false, text: "non"),
MyObj(enabled: true, text: "yep"),
] print(
collection.filter { $0.enabled }
.map { $0.text }
)Got this weird error today while futzing around with AutoLayout, or more specifically VFL, Visual Format Language:
    2016-08-11 11:05:00.915 TestTruckButton[74067:6491323] -[UIImage nsli_superitem]: unrecognized selector sent to instance 0x7fb8fbc4ae80
    2016-08-11 11:05:00.924 TestTruckButton[74067:6491323] *** Terminating app due to uncaught exception 'NSInvalidArgumentException', reason: '-[UIImage nsli_superitem]: unrecognized selector sent to instance 0x7fb8fbc4ae80'
    *** First throw call stack:
    (
    0   CoreFoundation                      0x000000010301cd85 __exceptionPreprocess + 165
    1   libobjc.A.dylib                     0x0000000104dc3deb objc_exception_throw + 48
    2   CoreFoundation                      0x0000000103025d3d -[NSObject(NSObject) doesNotRecognizeSelector:] + 205
    3   CoreFoundation                      0x0000000102f6bcfa ___forwarding___ + 970
    4   CoreFoundation                      0x0000000102f6b8a8 _CF_forwarding_prep_0 + 120
    5   Foundation                          0x00000001034037af -[NSLayoutConstraintParser findContainerView] + 49
    6   Foundation                          0x00000001034033ae -[NSLayoutConstraintParser finishConstraint] + 691
    7   Foundation                          0x0000000103402986 -[NSLayoutConstraintParser parse] + 375
    8   Foundation                          0x00000001034025c6 +[NSLayoutConstraintParser constraintsWithVisualFormat:options:metrics:views:] + 91
    .......
    .......
    .......
    libc++abi.dylib: terminating with uncaught exception of type NSException
This happened because you tried to use an UIImage instead of an UIImageView in VFL. Just leaving this here so AltaVista & Co. can find it.
For my last project, I've been using Veertu. I consider it the hidden gem of desktop virtualization. The big boys in this space are basically Parallels, VMWare and VirtualBox. They all require loads of kernel drivers, and personally I like my Mac as bog-standard as possible.
But since last year, there is Veertu. It uses Apple's own Hypervisor framework and it's distributed through the Mac App Store. I consider this a major accomplishment. Recently some Mac apps have been leaving the store citing limitations of one or the other, but these guys have managed to get their virtualization app running in the sandbox that the App Store requires!
Amazing, really. And it's a good product as well. I've been using it to test Ansible scripts. The backend of my client's project was deployed via Ansible but the script hadn't been maintained for some time. It was very nice to kick up a fresh Ubuntu server instance, test the Ansible script and log any issues that occurred so our backend guy could have a look.
And this is a small thing, but shows attention to detail: the IP address is shown in the list of running VMs: 
Veertu is first and foremost an OS X app so looks and behaves very much like you'd expect, unlike for instance VirtualBox. I've read about some limitations related to graphics performance and USB support. For my purposes, I haven't run into these. I did notice it doesn't yet support sparse files, in the sense that when you reserve 20 GB for your VM, it really does reserve 20 gigs on disk. In my case that wasn't a problem; my VMs don't have a long life.
They're updating it all the time; last update was roughly three weeks ago. So for instance the sparse files thing seems to have been fixed.
In any case, since Veertu is free for basic Linux usage, why not try and see if it supports your use case? To give it a shot with the least amount of hassle, install and start Veertu, add a VM and pick Ubuntu Gnome 16.04 desktop. After downloading, the VM will be started. Then instead of installing, select "Try Ubuntu":

Some links:
Xcode has an option to run a script when building. This is necessary for example when using Carthage. Reading the instructions, Carthage says: "Create a Run Script in which you specify your shell (ex: bin/sh), add the following contents to the script area below the shell: /usr/local/bin/carthage copy-frameworks"
However, to make things easy for your (new) colleagues, I urge you to create an extremely clear error message. You can do this as follows. First, when adding a Run Script phase, change the shell to /bin/bash. Then add an error message by checking for prerequisites, and printing to stderr combined with an "exit 1". For Carthage you could do the following:
    CARTHAGE="/usr/local/bin/carthage"
    if [[ -e "$CARTHAGE" ]]; then
        /usr/local/bin/carthage copy-frameworks
    else
        echo "--------------------------------------------------------"  1>&2
        echo 1>&2
        echo "Please install carthage, see also:"  1>&2
        echo "https://github.com/Carthage/Carthage#installing-carthage"  1>&2
        echo 1>&2
        echo "--------------------------------------------------------"  1>&2
        exit 1
    fi
This results in the following very obvious message when Carthage is not installed:

I don't think anybody would object to such a nice pointer in the right direction.
Here's how you can install a Kyocera FS2020D printer on OS X.
First, download and install the driver: https://www.kyoceradocumentsolutions.co.uk/index/products/download_centre.false.driver.FS2020D._.EN.html#MAC This will cause an additional icon to appear in the System Properties app. It's labeled "Select PDL". You can ignore it.
If you have the hostname or IP address of the printer, great. If not, find out the IP address of the printer as follows. On the printer, press the menu button, then arrow right and arrow down. The display should say "status page". Press OK and a single status page is printed. It'll mention a couple of things, but most importantly its IP address.
On OS X, in System Preferences, go to Printers & Scanners, add a printer with the plus button, go to the second tab and fill in the IP address. Set protocol to Line Printer Daemon.
That should be all you have to do. If you wish, adjust the name, then click the Add button.
Happy printing.
Here's a nice quote from Philip Morgan:
"If you look at your marketing message and say, “wow, there are probably only 10 companies out there that fit that profile”, then you are in the right ballpark in terms of specificity. The reality is that there will be far more than 10 candidates, and those 50 or 100 truly ideal clients will find your marketing extremely compelling. Trust me, they won’t find it compelling if you don’t have the courage to be extremely specific.”
If for some reason you are moving from Safari to Firefox on OS X, you might miss the Cmd-Shift-H shortcut key to go to the homepage. On Firefox, this is by default Option-Home but since there's no Home key on Apple keyboards, this becomes the Fn-Option-LeftArrow shortcut which I can never remember.
An alternative is to press Option-K, Enter. It'll focus on the search field in the toolbar, and pressing enter will take you to the search engine home page.
If you have removed the search field from the toolbar, then simply pressing Option-K will be enough. Very useful when you don't want to close the last remaining tab, but want to clear the current page. Update 2016-11-22: this last option no longer works because it'll open the options menu and focus on the search field there.
Here's a copy/paste example of doing the equivalent of a SQL MAX() function. I know, I know "CoreData is an object graph". It's in a project where I had to keep track of the sequence in which entities were added. As far as I know, there's no equivalent of AutoIncrement in CoreData.
    func nextSequence(moc: NSManagedObjectContext) -> Int {
        let quantityExpression = NSExpressionDescription()
        quantityExpression.name = "max.sequence"
        quantityExpression.expression = NSExpression(format: "@max.sequence")
        quantityExpression.expressionResultType = .Integer32AttributeType

        let predicate = NSPredicate(format: "form == %@", self.form)

        let request = NSFetchRequest()
        request.entity = NSEntityDescription.entityForName("UMAQuestion", inManagedObjectContext: moc)
    //  request.propertiesToGroupBy = ["sequence"]
        request.resultType = NSFetchRequestResultType.DictionaryResultType
        request.propertiesToFetch = [quantityExpression]
        request.predicate = predicate

        var maxSequence = 0

        do {
            let results = try moc.executeFetchRequest(request) as? [[String:AnyObject]]
            if let maxSequenceDict = results!.first {
                if let maxSequenceResult: AnyObject = maxSequenceDict["max.sequence"] {
                    maxSequence = maxSequenceResult as! Int
                } else {
                    fatalError("Couldn't find max.sequence in dict")
                }
            } else {
                fatalError("Didn't get first result")
            }
        } catch let error as NSError {
            fatalError("Error fetching max sequence: \(error)")
        }
        return maxSequence + 1
    }
Paste this in your model file. Adjust the predicate or uncomment and adjust the propertiesToGroupBy.
Last time, I showed how I installed the LetsEncrypt certificates but not how to automatically renew them. To do so, create a file and call it, say, "letsencrypt.sh" or something, then move it to a directory of your choice. /opt was empty so I put it there. Adapt the webroot and domain parameters of course. This works on Debian 8.0 so your mileage may vary.
  #!/bin/sh
  letsencrypt certonly --force-renewal --webroot -w /var/www/example.com -d example.com
  service apache2 reload
The --force-renewal is there because we renew monthly, while the certs are valid for three months and the client warns about this.
Now create a file in /etc/cron.d so the script gets called. Be sure to not just call it on midnight the 1st of every month -- we want to call it at some particular randomly chosen moment so the letsencrypt people don't get hit with a deluge of calls every 1st of the month. So create a file named "letsencrypt" in /etc/cron.d with the following line:
33 5 21 * * root /opt/letsencrypt.sh
This particular example will call the script on the 33rd minute, on the 5th hour, and on the 21st day of the month. In other words, it'll get called once on 5:33 AM every month. Make up some values for your particular case.
It's prudent to now put a marker after this date in your calendar, to actually check whether the renewal succeeded.
As an aside, the letsencrypt package is called certbot nowadays. It's at version 7. It might be better to follow their instructions :)
Since ages, I've had these Logitech V20 speakers (serial number S-0155A) which get both their power and their audio over USB:
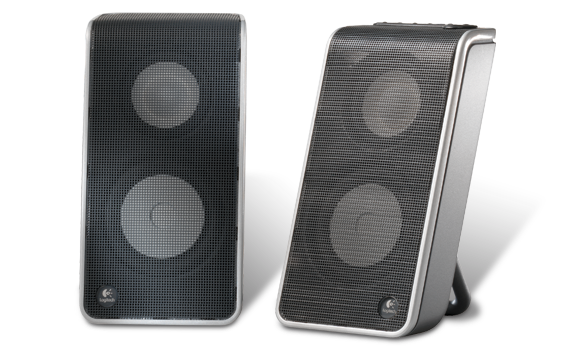
There are a couple of awesome things about these:
Until recently, people would ask me where to get these. But unfortunately they long since went out of stock everywhere and you'd have to rely on the second-hand market. But lately I found out that Logitech makes a new model that strictly uses USB for both audio and power: the Logitech S150.
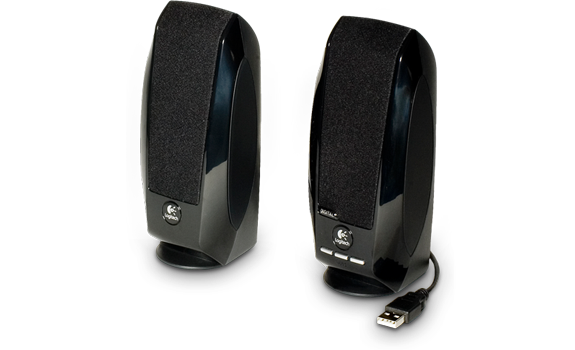
Edit 2016-11-28: a colleague pointed me to other speakers that are hooked up via USB only:
Edit 2016-12-07: I've tested the Logitech S150 and they're not comparable in sound quality to the old v20 speakers. I'd only advise these as a step up from laptop speakers.
This is a 100% scoring solution to the Codility StoneWall problem. Note the bunch of print statements which I've left included for now.
  //: https://codility.com/programmers/task/stone_wall/
  import UIKit
  public func solution1(inout H : [Int]) -> Int {
    var stack: [Int] = []
    var nBlocks = 0
    var i = 0
    var lastHeight = 0

    func append(height: Int) {
      print("append \(height)")
      stack.append(height)
      lastHeight = height
      nBlocks += 1
    }

    while i < H.count {
      let currHeight = H[i]
      print("i=\(i), currHeight=\(currHeight)")
      if i == 0 {
        append(currHeight)
      } else {
        if currHeight == lastHeight {
          print("currHeight == lastHeight")
        } else if currHeight > lastHeight {
          append(currHeight)
        } else { // currHeight < lastHeight
          // Keep popping
          stack.popLast()
          var found = false
          while !stack.isEmpty {
            let lastAppendedHeight = stack.last!

            if lastAppendedHeight == currHeight {
              print("lastAppendedHeight == currHeight == \(currHeight)")
              lastHeight = currHeight
              found = true
              break
            } else if lastAppendedHeight < currHeight {
              print("break")
              break
            }
            print("popLast")
            stack.popLast()
          }
          if !found {
            append(currHeight)
          }
        }

      }

      i += 1
    }

    return nBlocks
  }
var H = [8,8,5,7,9,8,7,4,8] H = [1,2,3,4,5] H = [1,1,1,1,1,1,1,1,1] H = [1,2,3,3,3,2,2,2,2,2,1] H = [5,4,3,2,1] H = [1,2,1,2,1,2]
solution1(&H)
If you didn't know Codility: it's a company that devises programming tests that are used to test applicants for a job opening. Besides that, other uses are simply to exercise oneself, gaining skills in solving programming puzzles.
And now it supports Swift! I've been having fun doing some small puzzles here and there. For example, this is my solution to the Number of Intersecting Disks problem.
And for Lesson 7, the Brackets test, here is the solution I came up with:
//: Playground - noun: a place where people can play
import UIKit
    enum Bracket: Character {
        case squareOpen = "["
        case squareClose = "]"
        case roundOpen = "("
        case roundClose = ")"
        case curlyOpen = "{"
        case curlyClose = "}"
    }
public func solution(inout S : String) -> Int {
var bracketStack: Array<Bracket> = []
for bracketChar in S.characters {
guard let bracket = Bracket(rawValue: bracketChar) else {
return 0
}
switch bracket {
case .squareOpen, .roundOpen, .curlyOpen:
bracketStack.append(bracket)
case .squareClose:
if let b = bracketStack.popLast() {
if b != .squareOpen {
return 0
}
} else {
return 0
}
case .roundClose:
if let b = bracketStack.popLast() {
if b != .roundOpen {
return 0
}
} else {
return 0
}
case .curlyClose:
if let b = bracketStack.popLast() {
if b != .curlyOpen {
return 0
}
} else {
return 0
}
}
}
if bracketStack.count > 0 {
return 0
}
return 1
} var validString = "{[()()]}"
var invalidString = "([)()]" solution(&validString)
solution(&invalidString)Erica Sadun about updating Xcode. The Mac App Store prompted her to update Xcode, and that's what she did. Unfortunately, the download is very big and you don't really have control over the download and update process.
I've learned long ago that it's much better to simply download the .dmg file by logging in as a developer, going to the Xcode downloads page, click on the link "Additional tools", and download the .dmg file from there.
I rename the existing installation to, for example /Applications/Xcode-7.2.app so I always can go back. And from the .dmg, copy the new version to /Applications. Then if my current project nicely compiles and deploys, I remove the old Xcode installation.
As an aside, I really hope Apple will give developers a way to download that multi-gigabyte file from the commandline or perhaps in chunks of 500 megs or something. The whole root of the XcodeGhost problem was that developers were downloading Xcode from a fast 3rd party server, because the usual route wasn't feasible.
Another day, another TLS certificate from the friendly folks at Let's Encrypt! I'm running Debian 8.2 (Jessie) so I took the following steps:
Add the following lines to /etc/apt/sources.list
 # Backports repository
 deb http://httpredir.debian.org/debian jessie-backports main contrib non-free
Update the lot, then install the client:
 $ sudo apt-get update
 $ sudo apt-get install -t jessie-backports letsencrypt
I'm running Apache and had SSL configured already. So I ran the client:
$ sudo letsencrypt certonly --webroot -w /var/www/vankuik/www/ -d www.vankuik.nl
Then updated the domain configuration to the following lines:
 SSLCertificateFile    /etc/letsencrypt/live/www.vankuik.nl/cert.pem
 SSLCertificateKeyFile /etc/letsencrypt/live/www.vankuik.nl/privkey.pem
 SSLCertificateChainFile /etc/letsencrypt/live/www.vankuik.nl/chain.pem
Restart Apache:
$ sudo service apache2 restart
And then reload in your browser. Et voilà, the results are in:

See also 2016-05-16 Renewing letsencrypt certificates via crontab.
Just a tip for all you Linux-loving fiends out there: after installing a server, no matter how small, you'd be wise to install sshguard. It's available on Debian, Ubuntu and all other Debian-derivates.
After installation, simply type:
$ sudo apt-get install sshguard
This package will block bruteforce attacks and the like.
Here's a quick-and-dirty copy-paste example of a regex in Swift 2.0. It pulls the width and height as integers from the string in the first line.
var str = "codecType: 'avc1' dimensions: 640 x 360} extensions: {<CFBasicHash 0x128511ae0 [0x19f53cb68]>{type = immutable dict, count = 15" let regex = try! NSRegularExpression(pattern: "[0-9]{2,4} x [0-9]{2,4}", options: [])
if let result = regex.firstMatchInString(str, options: [], range: NSMakeRange(0, str.characters.count)) {
let dimensionString = (str as NSString).substringWithRange(result.range)
let dimensionArray = dimensionString.componentsSeparatedByString(" x ")
let width = Int(dimensionArray[0])
let height = Int(dimensionArray[1])
// Now do something with the width and height integers
}Today, Swift gave me the error:
Instance member "membername" cannot be used on type "Classname"
The code was as follows:
  public class SomeClass {
      public let defaultGreeting = "Hello, playground"
      public var greeting = defaultGreeting
  }
The solution is as follows:
  public class SomeClass {
      public let defaultGreeting = "Hello, playground"
      public var greeting: String!

      init() {
          self.greeting = defaultGreeting
      }
  }
The reason you're getting the error, is because the class member defaultGreeting is declared but not yet initialized at the class scope. However, when you hit init() then it's available.
I've always been a fan of the Microsoft ergonomic keyboards. They offer the best keyboards in the "ergonomic" category for their price. The Sculpt Ergonomic got a great review from Marco Arment and I totally agree with Mr. Arment on all points.
Recently however, I spilled some tea-with-milk on the keyboard. It was really just a sip, and it hit the right Alt key. But somehow gravity took that liquid and ran it down to the arrow keys and the backspace button. I opened the keyboard but unfortunately it's a scissor-switch keyboard where the rubber keypad cannot be reached. It's backed by an metal underside that is melted to the top case of the keyboard. See the picture below; the black dots are studs whose tops have been melted flat.

Larger version: MS Sculpt Ergonomic 1.JPG
However I did succeed in getting it working again!
Prerequisites: I bought a 1 liter (33 oz) bottle of demineralized water and a 125 ml (4 oz) bottle of alcohol.
Then take the following steps:

Larger version: MS Sculpt Ergonomic 3.JPG

Larger version: MS Sculpt Ergonomic 4.JPG
As an app developer, I've always been following the new Mac Pro (usually shortened to nMP, as opposed to the cMP, where c stands for classic). For portability reasons, clients usually give me a retina MacBook Pro to work on, but the Mac Pro is a desktop computer. Thus it offers all that desktops usually offer: more power.
If you're a desktop person then for some time, the Mac Pro hasn't been the first choice; usually the 5K iMacs would be a better choice. App developer Marco Arment explains why: The Retina iMac versus the Mac Pro.
And then there's the fact that the nMP couldn't really be called "new" at this point. Both the CPU and the GPU are pretty old tech. And its SSD is easily beaten by the SSD in the 2015 rMBP. It hasn't been updated since its release end of 2013 and the MacRumors Buyer's Guide maintains a disheartening running tally since its last update.
For 2016 however, the stars might align and Apple may give some love to the nMP. Over at the MacRumors forums, enthusiasts have been speculating and there has been long-running thread with the subject Will there be a new Mac Pro in 2016. User Stacc gave an excellent summary of that thread which explains what we can expect of the new Mac Pro.
A little trick if you want to save some space and/or bandwidth; compress your PNG files. Although PNG is a lossless format, you can compress them if the image in question doesn't have a lot of colors. This is often the case when creating screenshots.
In yesterday's screenshot of my terminal window, there's obviously not a whole lot of color. OS X by default saves the image with 24-bits colors, but the image looks perfectly fine with just 8 bits. After compression, file sizes looked as follows:
 -rw-r--r--@ 1 bartvk  staff    88K Jan  8 12:11 Image_2016-01-08_dd_progress.png
 -rw-r--r--  1 bartvk  staff    17K Jan  8 12:13 Image_2016-01-08_dd_progress-fs8.png
That's not so bad. The pngquant homepage is here and on OS X, it's easily installed with a quick
$ brew install pngquant
The commandline utilities that come installed with OS X originate from the BSD world. This means that option-wise, they're fairly spartan as opposed to GNU userland.
Today, I needed to create a bootable USB stick to install Ubuntu. It works fine and basically tells you to use dd to copy a bootable image to a USB stick.
Now if you have a slow USB stick, this can take ages and you're wondering if it's making progress. To see what it's doing, open another terminal and find the process number of dd:
  $ ps -ef | grep "dd if"
  501 76765   412   0 11:29AM ttys000    0:16.19 dd if=/Users/bartvk/Desktop/ubuntu-15.10-desktop-amd64.img of=/dev/disk1 bs=1m
  501 76786 75363   0 11:29AM ttys002    0:00.00 grep "dd if"
The second number of the first line is the process ID, in this case, 76765. Now run the following command:
$ while true; do sudo kill -SIGINFO 76765; sleep 5; done
This will cause the running dd to print out statistics (roughly) every 5 seconds.

John Gordon writes about losing images in an old document on Google Drive:
A Google Doc I wrote in 2010 has lost its images
I encountered this issue right when the transition was made from the old editor to the new editor, which might have been around 2010 (not sure about that). Since then, I had gotten weary. Whenever I'd create an important document, I'd create a folder on Google Drive, put the images and other assets in there, then include them in the document. In other words, they would never be just in that document.
With Google Drive, I first thought that all files (Goole Docs, Sheets, etc.) would be synced locally, and that my local backup solution (Time Machine) would save a copy. But to make sure that happened, I tried to figure it out and create a matrix of what was viewable and editable offline: 2013-09-28 Criticism of Google Drive. In the end, I figured it was very hard to get a reliable backup of Google Docs, Sheets etc.
Back then, I hated the Microsoft Office format lock-in. Google seemed somewhat more open, and it was. But only in the sense that they had an export to the Open Office format. Their own format is very much closed, and has remained so for all this time. With Microsoft Office at least your local backup solution works fine, and the format is understood to a certain degree and imported by a number of software packages, some of them open source.