2013-12-20 Performance test of USB ethernet adapters on OS X
I've got two USB-based network adapters laying around here: the official Apple USB 2 Ethernet Adapter and this USB 3.0 ethernet adapter based on the Asix AX88179 chipset.
Then I connect over a VPN, and use scp to see how much time it takes to pull over a 100 MB test file. With the Apple adapter:
  $ scp testbox:~/tmp/a.log .
  a.log                    100%  100MB   3.0MB/s   00:33
And now with the USB 3 based adapter:
  $ scp testbox:~/tmp/a.log .
  a.log                    100%  100MB   2.9MB/s   00:34
Huh weird, no difference. I'll go and check where the bottleneck lays. VPN? scp?
Not using VPN gives the following result:
  $ scp gateway.company.tld:a.log .
  a.log                    100%  100MB  16.7MB/s   00:06
That's somewhat better. Testing without scp, but with wget instead shows roughly the same number:
  $ wget http://www.company.tld/some_video.mov
  100%[====================>] 126,805,954 16.0MB/s   in 7.6s
Now I test it on a different machine, within the company network:
 $ wget http://www.company.tld/some_video.mov
 100%[====================>] 126,805,954 64.1M/s   in 1.9s
That's better. So the bottleneck is apparently the physical (ethernet) connection I've got, which is VLAN'ed to provide a guest network. Oh well.
Long story short: better check this guy's test results. You should be able to get up to 110 MB/s.
2013-10-25 What is new in OS X Mavericks
I'm running a little comparison of the file system of a Mavericks install and a Mountain Lion install, to see what's new and what has disappeared.
So far, I found that Mavericks added the following drivers:
- ArcMSR -- For Areca RAID stuff, although I can't find a clear list somewhere
- ATTOCelerityFC8, ATTOExpressSASHBA2, ATTOExpressSASRAID2 -- See the announcement from Atto
- CalDigitHDPro -- For CalDigit's HDPro RAID hardware
- HighPointIOP, HighPointRR -- [1]
- PromiseSTEX -- For Promise its SuperTrak EX RAID controllers
- SoftRAID -- driver for a software-managed RAID array: http://www.softraid.com
- Canon IJScanner4 -- for Canon's multifunctional printer/scanners
Mavericks also added Ruby 2.0 (up from 1.8 in Mountain Lion).
I found a number of apps in /System/Library/CoreServices that are new:
- Install Command Line Developer Tools -- calling any of the binaries related to development (like /usr/bin/cc) will instead call this Xcode installation utility
- Keychain Circle Notification -- App that allows you to grant other devices access to this Mac its keychain, used for iCloud syncing of passwords (for example those used in the browser)
- Pass Viewer -- "partial support for Passbook passes, letting you view emailed passes on your Mac" -- source: MacWorld: Get to know OS X Mavericks: Apple Mail 7.0
There's also a number of new drivers in the /System/Library/Extensions folder:
- AppleHSSPIHIDDriver, AppleHSSPISupport, AppleHWAccess: would seem to be for communication with keyboards, trackpads, and other buttons (like a hinge-button) that use an SPI bus
- AppleIntelFramebufferAzul: obviously a display driver, but don't know what exactly
- Driver for the new Intel HD5000 stuff
- AppleIntelHSWVA driver, HSW is Haswell, but VA?
- AppleIntelLpssDmac, AppleIntelLpssGspi, AppleIntelLpssSpiController: LPSS is Intel's Low Power SubSystem stuff, the Linux kernel uses this acronym when talking about Intel's Bay Trail architecture
- AppleThunderboltIP, that's the driver for tunneling IP over Thunderbolt, duh :D I'm confused if this has anything to do with the Thunderbolt ethernet driver, I don't think so.
- AppleTopCase, ?
- GeForce Tesla driver, maybe a driver for the Mac Pro
- IOReportFamily driver, ?
- vecLib, see also [2]
In the /System/Library/Frameworks folder, there are a number of new libraries:
- AVKit.framework
- GameController.framework
- MapKit.framework
- MediaAccessibility.framework
- MediaLibrary.framework
- SpriteKit.framework
In /usr/bin, there are a bunch of new executables:
- afida -- Audio File Image Distortion Analyzer
- footprint -- gathers memory information about a process or set of processes
- ipmitool -- utility for controlling IPMI-enabled devices
- ippfind -- find internet printing protocol printers
- json_pp -- a Perl-based utility for working with JSON
- jvisualvm -- ?
- lsappinfo -- Control and query CoreApplicationServices about the app state on the system
- ncdestroy -- Destroy kernel NFS credentials
- pluginkit -- manages the PlugInKit subsystem for the current user. It can query for plugin matches, as well as explicitly change the plugin database.
- powermetrics -- gathers and display CPU usage statistics
- timer_analyser.d -- ?
- timerfires -- analyze timers as they fire
- wdutil -- Wireless Diagnostics command line utility
- zipdetails -- display the internal structure of zip files
In /usr/sbin:
- ioalloccount -- Summarize IOKit memory usage.
- purge -- force disk cache to be purged (flushed and emptied)
- sndiskmove -- Xsan File System Disk Mover Utility
- systemstats -- shows a selection of statistics about system power usage
- taskpolicy -- execute a program with an altered I/O or scheduling policy. Not sure how this relates to the standard Unix commandline utility "nice"
2013-10-13 Extend drive space in your MacBook Air 2013
Recently I got a MacBook Air, but it wasn't within my budget to get the bigger SSD. The standard SSD is advertised as 128 GB. In practice, this means 112 GiB, so I went looking for additional ways to get some extra storage space.
First and most cheapest, you can get an external harddisk. On one hand, it's very cheap. On the other hand, you have to remember taking it with you, and it's another wire and another device on your desk.
As an extension to that, there's the various wireless external harddisks. This Lifehacker article lists a few: Add Wireless Storage to Phones, Tablets, and Laptops with Wi-Fi Drives.
There's a number of USB-sticks that are so small, you can just leave them in. Here's a nice list of them:
- Sandisk Cruzer Fit, currently max. 32 G (warning: I've seen a forum post that these are very slow)
- Kingston DataTraveler Micro, maximum 64 GB
- Patriot Autobahn currently also 32 GB
- Verbatim Store 'n' Stay, maximum 32 GB
Of these, I really like the Verbatim Store 'n' Stay because it seems the smallest of the bunch.
There's also a number of solutions that use the SD-card slot. They're basically adapters that take a micro-SD card. They're sized such that they sit flush with the outside of the MacBook.
- The Nifty Minidrive which looks best and is most expensive, with different options for each MacBook (pro retina, air, pro)
- The MiniDrive a knock-off with mixed reviews on Amazon
- BaseQi, another knock-off sold via eBay
Of these three, I am now testing the last one, and it sits perfectly flush with the MacBook Air's chassis:

I've got it fitted with a 16 GB micro-SD and it seems to work fine. There is no loss of speed noticeable, when comparing with the micro-SD-to-standard-SD-adapter that came with this card.
2013-10-01 Find out Debian release name in one line
What you've always wanted: finding out the Debian release name in one commandline:
$ lsb_release -a 2>/dev/null | tail -1 | awk '{print $2}'Edit: it's way easier than that:
$ lsb_release -c -s
2013-09-29 MacBook Air 2013 SD card speed test
Since the SD card slot on the 2013 MacBook Air is connected via the USB 3 bus (instead of USB 2), it shouldn't be limited anymore by USB2 speeds (i.e. theoretical maximum of 480 Mbit/s). The new limit is 5 Gb/s.
So I ran a little test of whatever I've got lying around. I used the Black Magic disk speed test, with a 1 GB test file.
| Card | Read speed | Write speed | Remarks |
| SanDisk 2 GB micro-SD card | 17.4 MB/s | 3.4 MB/s | Came with my Android phone |
| Kingmax 16 GB micro-SD card | 21.0 MB/s | 9.3 MB/s | Bought to replace the small SD card above |
| Nikon-branded 2GB SD card | 11.3 MB/s | 5.6 MB/s | Came with my Nikon point-and-shoot camera |
| No-name 2GB SD | 13.7 MB/s | 5.2 MB/s |
It's not a very interesting test; none of these is above the theoretical maximum of 60 MB/s for USB 2.
2013-09-28 Criticism of Google Drive
Update 2013-12-12
There have been some improvements to Google Sheets, including offline editing in Chrome.
Update 2013-11-16
The release notes mention that since Google Drive version 1.9, "you’ll be able to access your most recent Google documents on drive.google.com, even while offline. Simply open any Google document from your local Google Drive folder and Chrome will display the file for you to edit".
Note that this goes for documents, not for slides or sheets.
Original text follows
Here's a couple of problems I encountered with Google Drive.
The major problem I have is the offline feature of Google Drive. The obvious problem is that although Google drive seems to sync everything to your computer, that's not the case for the Google Apps documents (docs, drawings, sheets and slides). These are just links to their online version. Thus Google Drive is two things: it syncs normal files to between Google and local storage. And it lists all Google Apps documents. In that last instance, no real two-way syncing there. You can't create a local Google Apps document or something.
You can, however, use Google Chrome (not any other browser), and say that you want to be able to work offline. You can then go to http://drive.google.com/offline.
This feature doesn't come with Google Drive, nor is it enabled by it. It's a completely separate thing, and it will download your complete document storage again on your local drive, in your browser's cache. Being able to work offline means that you've got everything replicated twice on your local harddrive.
The second major problem is related to usage of this offline feature. I have tried to use the offline feature in three scenarios:
- Via a severely limited EDGE connection (i.e. not 3G or HSDPA, just plain old EDGE) with a maximum speed of 80 Kbit/s
- Via a crowded wireless network, which my MacBook kept dropping
- Via a wireless network in the train, which in its turn was routed through a 3G connection
In neither of these instances, Google Docs was able to keep up. Sometimes, the interface doesn't load. Sometimes, it thinks it loses connection because the speed is in the range of 8 to 40 Kbit/s. Often, it fails to save the last typed lines and says I should reload the document (which then loses the last sentences entered). All the time, it displays errors about not being able to connect, a vague error about server error, or about reconnecting.
All in all, it works when you have a steady net connection. But the technology isn't there yet.
QuickOffice
Small update. Google introduced QuickOffice back into the App Store. It allows you to edit Microsoft Office documents. This sounds great in principle. There's a couple of things I find weird with this. Firstly, this app is separate from the Google Drive app and I can't seem to find a good reason why. Secondly, the iPad now offers something that Google Docs (in your browser) does not offer. Thirdly, the QuickOffice app has a weird 'file cache', a storage area on the iPad itself, where you can create and edit documents. You can mail and print them, but you can't copy them to Google Drive.
| Device & software | Docs | Sheets | Slides | Drawings | MS Office | Editable offline |
| iPad Google Drive app | Edit | Edit | Edit | View | View | Per document |
| iPad QuickOffice app | View | View | View | View | Edit | No |
| Browser | Edit | Edit | Edit | Edit | View | Only in Chrome |
| PC with MS Office | -- | -- | -- | -- | Edit | Always |
In my opinion, this is too complicated.
Conclusion
In my opinion, it would be much better when you could simply say: "In your browser as well as on your iPad, Google Drive can edit all sorts of files in your browser, including MS Office".
We're not there yet. And I wonder if we'll ever see a full-fledged offline editing solution for Google Docs. After all, why would they? Then Google has to open their file format, just like Microsoft was forced by law to do with the Office file formats. Now you can say that Google is a lot more open, because you can easily download the documents in other formats. But you can't really -- they're not natively editable anymore after exporting. You could export, then import them again, but that is a bit strange for a document that's yours, and you'll lose lots of markup in the process.
I think Google sees the complex and weird situation that now exists, and I am very curious about the future.
2013-09-26 Speed comparison of different ciphers on an SSH tunnel
Today I got curious what the speed differences are when you use a different cipher for an SSH tunnel.
First, create a 100 MB testfile on the remote box:
 you@remote $ cd /var/www
 you@remote $ sudo dd if=/dev/urandom of=./testfile100mb.bin bs=1M count=100
Then set up a tunnel from your local desktop to your remote webserver, and use wget to test it:
In one terminal (using the default cipher here):
you@local $ ssh -L8080:localhost:80 remote
In the other:
 you@local $ wget http://localhost:8080/testfile100mb.bin
 (3.87 MB/s) - ‘testfile100mb.bin’ saved
Now exit the tunnel and retry with another cipher:
you@local $ ssh -c arcfour256 -L8080:localhost:80 remote
 you@local $ wget http://localhost:8080/testfile100mb.bin
 (3.87 MB/s) - ‘testfile100mb.bin.1’ saved
Hmmm, that's not much. And not encrypting anything doesn't work:
 you@local $ ssh -c none -L8080:localhost:80 remote
 No valid ciphers for protocol version 2 given, using defaults.
Then we'll just have to trust the developers:
http://blog.famzah.net/2010/06/11/openssh-ciphers-performance-benchmark/
2013-08-26 Testing real capacity of an USB stick
I've read about fake oversized thumb drives / USB sticks, which report a much bigger size than they actually are.
To test the real capacity of an USB stick under OS X, we'll create a test file and write it to the USB stick a number of times. Then we'll verify what has been written with a couple of terminal commands.
This is a pretty brute-force test and I'm sure it can be done much smarter. I'll give an idea on speeds, and I assume USB 2.0, and also assume a maximum write speed of 15 MB/s, and maximum read speed of 30 MB/s. Furthermore, we're working with 1 GB equalling 1 thousand million bytes, because that's what they use on the packaging.
First, we format the disk. Start Disk Utility and erase it. This is to remove any files in the Trash.

Notice the capacity in the lower right. In this case, it's 16 GB. We'll need that later.
Now open a terminal window. See under which directory the stick is mounted:
 $ ls -l /Volumes
 total 24
 lrwxr-xr-x  1 root    admin     1 Aug 20 07:12 Macintosh HD -> /
 drwxrwxrwx@ 1 root  staff  8192 Aug 26 12:07 STORAGE
In the case above, the USB stick is called 'storage'. Go there.
$ cd /Volumes/STORAGE
First create a 100 megabyte test file on the USB stick like so (optimally, this takes 1 minute and 10 seconds):
 $ dd if=/dev/urandom of=test.bin bs=1000000 count=100
 100+0 records in
 100+0 records out
 100000000 bytes transferred in 9.029708 secs (11074555 bytes/sec)
Now copy the test file a number of times, as much as the number of gigs you expect on the USB stick, in this example, 16 gigabytes. To write a gigabyte, we need to write our 100 megabyte testfile ten times. 16 gigabyte times 10 is 160. A gigabyte takes about 1 minute and 10 seconds to write optimally. The OS might be able to completely cache the source test.bin file in memory, which saves on reading time.
$ for i in $(seq 1 160); do echo "Writing file $i"; cp test.bin test$i.bin; done
Probably, the last file will fail because although the stick might be 16 gigabytes, the filesystem also uses up some space.
Display the checksum of the first file. This can take half a minute.
 $ md5 test.bin
 MD5 (test.bin) = 0d3c4fe338109b09b61fcea3e11b0e4b
Now test the checksums of all files, excluding the correct results. My 16 GB stick took 8 minutes.
$ md5 *.bin | grep -v 0d3c4fe338109b09b61fcea3e11b0e4b
If you're testing a big SSD drive or something similar, better use xargs (because simply using an asterisk might be too much for the shell):
$ ls *.bin | xargs md5 | grep -v 0d3c4fe338109b09b61fcea3e11b0e4b
If something went wrong, then you should either see the OS give errors, or some files should give a different MD5 hash. As mentioned above, you can probably ignore the last file, which may not be fully written to disk.
2013-08-12 Page up and page down with a Logitech Marble on Linux
On Debian 7.x (Wheezy), I'm using the Logitech Trackman Marble. Mine has product number P/N 810-000767, a fantastic and long-lasting device. It has two small up/down buttons above the normal left/right buttons
I wanted these working under Linux, and give them the PageUp/PageDown function. I went the imwheel route, which involves the following steps:
1) Install imwheel with:
$ sudo apt-get install imwheel
2) Edit the file /etc/X11/imwheel/startup.conf to enable imwheel when you log into KDE. Find the line that starts with IMWHEEL_START, and set it to 1.
3) Edit the file /etc/X11/imwheel/imwheelrc and at the bottom, add the following lines:
 ".*"
 , Thumb1, Page_Down
 , Thumb2, Page_Up
4) Logout and log into KDE again
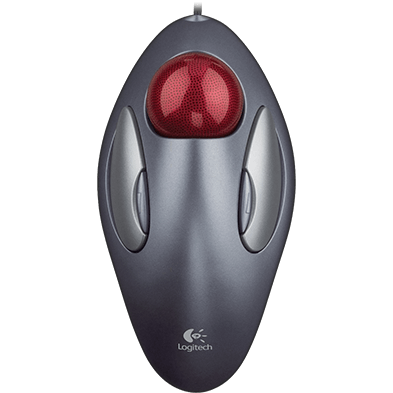
The Logitech Trackman Marble trackball.
2013-08-12 Measure the AC gain part 2
I've worked some more on a Python script that measures the gain (transfer) of the AC bias of the SQUIDs. To summarize my previous posting on this subject, this measurement assumes that we have put the array SQUID in flux-locked-loop. This also implies that we're dealing with a dual-SQUID configuration

More on this procedure later.
2013-06-15 Automatic updating of Google Drive
On my bog standard MacBook Pro, it seems that there's an update problem with Google Drive. It fails to automatically update itself. Perhaps it has to do with the fact that I'm running as a standard user, not the Administrator that OS X supplies by default.
I found others who share this problem, and decided to write a little shell script that checks the current version against the new version. Run it once a week and see whether you need to update or not.
#!/bin/sh
  URL="http://dl-ssl.google.com/drive/installgoogledrive.dmg"
  DEST=/tmp/installgoogledrive.dmg
  DESTMOUNT="Install Google Drive"
  wget --quiet --no-check-certificate -O "$DEST" "$URL"
  hdiutil mount -quiet "$DEST"
  PREV_VERSION=$(/usr/libexec/PlistBuddy -c "Print :CFBundleVersion" "/Applications/Google Drive.app/Contents/Info.plist")
  [ $? -ne 0 ] && exit 1
  VERSION=$(/usr/libexec/PlistBuddy -c "Print :CFBundleVersion" "/Volumes/$DESTMOUNT/Google Drive.app/Contents/Info.plist")
  [ $? -ne 0 ] && exit 1
  #echo "old version: [$PREV_VERSION], new version: [$VERSION]"
  if [ "$PREV_VERSION" != "$VERSION" ]; then
      echo "Please install update!"
  else
      echo "Google Drive is up to date."
      hdiutil unmount -quiet "/Volumes/$DESTMOUNT"
      rm "$DEST"
  fi
Copy the script into a file called "checkGoogleDriveVersion.sh" and put it in your Documents folder, for example. Drop to the commandline and make it executable:
  $ cd Documents
  $ chmod ugo+x checkGoogleDriveVersion.sh
Give it a test drive:
$ ./checkGoogleDriveVersion.sh
If it finds that you need to update, switch to finder and see that there's an opened DMG. Stop Google Drive, install the update and have fun.
2013-05-02 Test of current version of SAFARI scripts
Today, we ran a little test of the SAFARI demux/fee-scripts. It's the second time this week, and I'm quite happy how it all turns out.
We're finding some issues, but it's developing into a base from which we build a complete system. First we tested the menu for the testpulse generator.
This is an important part, because the testpulse generator can simulate a detector (with a pulse, it's like a particle hit the bolometer). It's fed into the feedback. Besides pulses, we can also generate a square wave. This allows the user to inject high frequencies into the system, which is apparently used to assess its robustness. For now, I'm just taking note of that.
When that appeared to work, we continued with the pixel menu. This is a part of the script that allows you to put a carrier wave routed to a certain pixel. You can change characteristics such as amplitude and frequency. We found some bugs there, but nothing serious.
We then turned on pixel 1, and routed the testpulse generator to that pixel, configured to generate pulses.
This resulted in the following picture on the scope:
We then used the "demux test" part of the script, and configured it to grab data, triggered on the testpulse generator. That resulted in the following plot:
The plot option has a number of options. The above plot is a "normal" plot (in the time domain). If you would zoom in, you'd see a sinus. The plot shows 400,000 samples or so, thus we'd just see a dense area plotted. The first part of the plot is pre-trigger data. Then the test signal generator pulses, and the amplitude drops. The logic behind that, is that our sensor behaves like a resistor. Upon particle impact, the resistance raises, thus the amplitude of our biasing signal is lowered. And that's why you see the "trough" in the plot above.
It's also possible to get a spectrum (i.e. plot in the frequency domain). We played with that too, and found some issues there.
Finally, we used the Demux Test menu choice, and configured it to grab data from ADC 1, which measures the error signal. This is the difference between the feedback and the input of the SQUID. The error signal is the cause of overdriving the SQUID. Because it's so sensitive to this, we want to eliminate the error signal as much as possible -- thus it's important that users can measure and plot this signal.
All in all, a nice result to head into the weekend.
2013-05-02 How does forking feel
May 1st brought us an awesome episode of the In Beta podcast on the 5by5 network.
Basically, Gina Trapani explains how it feels to a developer when her project is forked, and that forks take many different forms. Ultimately, it looks to me like good stuff is coming out.
2013-04-26 Asynchronous data from the SAFARI Demux board
Previously, I described how we measure the transfer of the AC bias.
To recap, we assume the user has characterized the DC biasing of the SQUID(s). When we measure the transfer of a single Array-SQUID or a dual-SQUID (i.e. pre-SQUID plus array-SQUID), we need to take the following steps:
- Set a DC bias on the SQUID(s)
- Set an AC bias current on the feedback coil
- Measure back the AC output voltage
- Increase the DC bias, and repeat the steps until we have covered a specified range (for example, from -5uA to 5uA in 20 steps)
Why do we put a test AC signal on the feedback coil, instead of sending it straight through a pixel on the sensor? Because each pixel has a hardwired LC filter, we could say. But that feedback coil is there, because the SQUIDs hardly have a dynamic range.
Let me put this in other words, because it's extremely important to understand the whole setup.
The SQUID is a very sensitive magnetometer. Thus the smallest change of flux will cause it to change its output. The output looks like a sine wave, thus it has an extremely small dynamic range (namely, the flank of a sinus). This means that we need a feedback loop that holds the SQUID locked to an output range. Because we have more than one pixel, we would run the SQUID out of its dynamic range. Thus the feedback loop ensures that, within its dynamic range, the SQUID can add all the pixel carrier waves.
To make this measurement, we use a set of registers that allow us to configure the Demux board to start spewing data over the second optical network link. It's very flexible and can be viewed as a number of digital data taps located on several points of the Demux board. You can set the data source, the amount of data, the trigger source, and finally whether you want a specified number of data blocks or just continuous data.
The data source can be configured to the ADC, the DACs, or the demodulated output of pixel 1 to 16. The ADC is of course what we need currently, but you can also read out the DACs. This is useful to check that the FPGA algorithms (more on that later) are correctly working. Finally to read the demodulated output of pixels is hugely useful, because (1) (see below).
The trigger source is worth a different topic, which involves explaining what the sensor actually measures (X-rays or infrared signals). The options currently are: testpulse generator (2), level triggering of selected pixels, both of these options, or just auto (get all the data).
For our purpose, we need to configure it as following:
- Set the data source to read out the ADC that's on the Demux board (there's two ADCs for historical reasons, but we only use the first one).
- Set the amount of data. We need to experiment with the amount that we actually need to request.
- As the trigger source, we currently set it so data is always, and immediately, returned.
Footnotes:
(1) Demodulation saves us bandwidth as well as processing on the PC.
(2) The testpulse generator is used to generate fake detector signals, to test the complete signal chain. You can test demodulation and/or test the electronical system. It generates the ideal detector signal. You can send the testpulse generator signal to the feedback coil of the SQUID and measure the PPM drift of the signal chain.
2013-04-15 State machine in Objective-C
Here's my version of a state machine in Objective-C, useful for your iOS or Mac OS X projects. There are many like it, but this one is mine. I've modeled an alarm clock here.
What I like about it: it's pretty small and light on the objects. The state transitions are the only thing that's done with an object, and even these could be replaced with a struct, but that causes problems with ARC (which doesn't like function pointers in structs).
The code below is WTFPL-licensed. Just so you know.
The header file:
    /* Enums that we need throughout this class to maintain state */
    enum WSAlarmState {WSAlarmStateInactive,
        WSAlarmStateActive, WSAlarmStatePlaying};
    enum WSAlarmAction {WSAlarmActionStart, WSAlarmActionPlay,
        WSAlarmActionSnooze, WSAlarmActionStop};
/* Describes how one state moves to the other */
@interface WSAlarmStateTransition : NSObject @property enum WSAlarmState srcState;
@property enum WSAlarmAction result;
@property enum WSAlarmState dstState;@end
    /* Singleton that maintains state for an alarm  */
    @interface WSAlarm : WSNotification
@property enum WSAlarmState currentState;
@end
The header file contains the enums for the states and the actions. Note that these actions are both used as a return value and as an input value.
The implementation file starts with the init method, which sets up the state transition table. Basically, this table says: given a state and a resulting action, what is the next state?
Furthermore, it contains a function that does all transitions, a function that looks up the next state, and the state methods.
#import "WSAlarm.h"
@implementation WSAlarmStateTransition
    - (id)init:(enum WSAlarmState)srcState :(enum WSAlarmAction)action :(enum WSAlarmState)dstState
    {
        if (self = [super init]) {
            // Do initialization here
            DLog(@"init");
            self.srcState = srcState;
            self.result = action;
            self.dstState = dstState;
        }
        return self;
    }
@end
    #pragma mark -
    #pragma mark WSAlarm class
@implementation WSAlarm {
NSArray *stateMethods;
NSArray *stateTransitions;
} - (id)init
{
if (self = [super init]) {
// Do initialization here
DLog(@"init");
self.currentState = WSAlarmStateInactive;
/* This array and enum WSAlarmStates must be in sync! */
stateMethods = @[
[NSValue valueWithPointer:@selector(noAlarmActiveState)],
[NSValue valueWithPointer:@selector(alarmActiveState)],
[NSValue valueWithPointer:@selector(playingAlarm)]
];
stateTransitions = @[
[[WSAlarmStateTransition alloc] init:WSAlarmStateInactive
:WSAlarmActionStart
:WSAlarmStateActive],
[[WSAlarmStateTransition alloc] init:WSAlarmStateActive
:WSAlarmActionPlay
:WSAlarmStatePlaying],
[[WSAlarmStateTransition alloc] init:WSAlarmStateActive
:WSAlarmActionStop
:WSAlarmStateInactive],
[[WSAlarmStateTransition alloc] init:WSAlarmStateActive
:WSAlarmActionForegrounded
:WSAlarmStatePlayedInBackground],
[[WSAlarmStateTransition alloc] init:WSAlarmStatePlaying
:WSAlarmActionStart
:WSAlarmStateActive],
[[WSAlarmStateTransition alloc] init:WSAlarmStatePlaying
:WSAlarmActionStop
:WSAlarmStateInactive],
[[WSAlarmStateTransition alloc] init:WSAlarmStatePlayedInBackground
:WSAlarmActionStart
:WSAlarmStateActive],
[[WSAlarmStateTransition alloc] init:WSAlarmStatePlayedInBackground
:WSAlarmActionStop
:WSAlarmStateInactive],
}
return self;
} - (void)registerDefaults
{
DLog(@"entry");
} #pragma mark -
#pragma mark Convenience methods - (void)start:(NSDate*)notifDate
{
self.notificationDate = notifDate;
[self transitionToState:WSAlarmStateActive withAction:WSAlarmActionStart];
} - (void)stop
{
[self transitionToState:WSAlarmStateInactive withAction:WSAlarmActionStop];
} - (void)play
{
[self transitionToState:WSAlarmStatePlaying withAction:WSAlarmActionPlay];
} - (void)snooze
{
[self transitionToState:WSAlarmStateActive withAction:WSAlarmActionSnooze];
} #pragma mark -
#pragma mark State machine // Walk through table of transitions, and return new state
- (enum WSAlarmState)lookupTransitionForState:(enum WSAlarmState)state
withResult:(enum WSAlarmAction)action
{
enum WSAlarmState newState = -1;
for(WSAlarmStateTransition *t in stateTransitions) {
if(t.srcState == state && t.result == action) {
// We found the new state.
newState = t.dstState;
break;
}
}
if(newState == -1) {
NSString *msg = [NSString stringWithFormat:
@"Can't transition from state %@ with return code %@",
alarmStateString[state], alarmActionString[action]];
@throw [NSException exceptionWithName:@"TransitionException"
reason:msg
userInfo:nil]; }
return newState;
} - (void)transitionToState:(enum WSAlarmState)newState withAction:(enum WSAlarmAction)result
{
NSValue *stateMethodValue = (NSValue*) stateMethods[newState];
SEL stateMethod = [stateMethodValue pointerValue];
// We need these because otherwise we get a warning
#pragma clang diagnostic push
#pragma clang diagnostic ignored "-Warc-performSelector-leaks"
NSNumber *param = [NSNumber numberWithInt:result];
enum WSAlarmAction nextAction = [self performSelector:stateMethod withObject:param];
#pragma clang diagnostic pop
self.currentState = [self lookupTransitionForState:self.currentState withResult:nextAction];
} #pragma mark -
#pragma mark States - (enum WSAlarmAction)noAlarmActiveState:(enum WSAlarmAction)action
{
// Some code to stop the alarm
return WSAlarmActionStop;
} - (enum WSAlarmAction)alarmActiveState:(enum WSAlarmAction)action
{
if(action == WSAlarmActionSnooze) {
// User tapped "snooze", stop the sound
} else if(action == WSAlarmActionStart) {
// No alarm active, user starts alarm
} else {
// We reached state alarm active with a weird action
}
return WSAlarmActionStart;
} - (enum WSAlarmAction)playingAlarmState:(enum WSAlarmAction)result
{
// Some code to play a sound
return WSAlarmActionPlay;
}@end
2013-04-11 measure the AC gain
A little intro
Another routine in the system is the AC gain curve measurement.
This routine is different from the previous one, 2013-04-09 Characterizing the transfer of a voltage biased SQUID. In that routine, we just looked at the DC part of the amplifier chain.
In this measurement, we assume those measurements were successful, and that the amplifier chain was set according to optimal parameters.
And since our instrument basically uses AC biased TESes (as explained here), we want to measure the transfer of the AC bias, after the SQUID has been configured optimally. This is very interesting, because that means you see the instrument as a whole, instead of characterizing a small part.
The sensor:
The measurement
So what we're going to do, is sweep the AC bias and then measure back the result.
To do this, we have to send the FPGA the appropriate commands. First, some schematics:
On the Demux board, there are two DACs that can drive the SQUID in the cryostat. There is also an ADC to measure back the result. The FEE board is in between here, but for now we can ignore it. The cryostat is where the above sensor is located. It has an array of TESes, each with its own LC filter.
If we want to feed in an AC bias, we don't want to use DAC2, because we don't want it filtered through the LC filters. Instead, the FPGA exposes a register where we can switch the input line of both DACs, so you can feed the AC bias signal to DAC1. Note that this AC bias signal is still digitized, otherwise we couldn't feed it into a DAC :-)
Settings
The user needs to be able to adjust the AC bias signal. The FPGA exposes a number of parameters for this, but we just need the frequency and amplitude, it's a really small signal: 2 MHz at 1 uA. Both are adjustable, and I'll add a setting for 1 and 5 MHz as well.
The data
We retrieve the data asynchronously. This is rather different from our usual way of getting data; i.e. normally we'd just polling a particular register.
In this case, the hardware has a special function called the "science switch". A possible analogy could be that this science switch acts as a number of water faucets, where you'd just let the raw data stream out of the board, from specific points. Since water and electronics don't mix much, it's actually a number of registers. I'll write more on that later.
2013-04-09 Characterizing the transfer of a voltage biased SQUID
Currently, I'm finishing a software routine to characterize the transfer (see below) of a voltage based SQUID. Simplified, our electronics could schematically be shown as follows:

Firstly, about this schema.
On the left, you see a single SQUID. This is the pre-SQUID. In the middle, you see an array of SQUIDs. We functionally treat that last one as a single squid, calling it "the" array-SQUID. These two types of SQUIDs are biased differently; the pre-SQUID is voltage-biased, and the array-SQUID is biased with a current.
You can view this combination as one "dual-stage SQUID".
So what we do, is: we set a current over the shunt on the left. This will put a voltage on the pre-SQUID and a magnetic field will form on the inductor next to the array-SQUID. We'll read out an output voltage on the right.
Now normally, the amount of voltage we put on the pre-SQUID would overdrive the array-SQUID. Thus, we put it in flux-locked loop. This is a mode where the array-SQUID simply passes current that results from the changes in flux.
Because the array-SQUID is in flux-locked-loop (FLL), we can measure the output current of the pre-SQUID without a dynamic range limitation (+/- 500 uA). This flux-locked-loop is nothing more than a feedback circuit which forces the bias of the array-SQUID down to zero.
Note that this is all DC-biased. The SQUIDs are part of the amplifier chain, and the whole amplifier chain is DC-biased. After we've characterized the amplifier chain, our primary purpose is to read out the sensor, consisting of a TES array that's AC-biased, see also 2012-07-02 Minimizing amplifier chain offset.
Secondly, about the routine itself.
I said "characterize the transfer". The transfer means: what is the effect of the input on the output. If you draw this function, you'd ideally see a sinus. We want to know in which voltage range our pre-SQUID behaves the best (i.e. where it has the highest dynamic range. In other words, you want to pick the voltage that's right in the middle on a flank. Because that way, with a little bit of input, you get a nice stretch of usable output.
Compare it to a radio that can receive a lot of stations.
2013-03-27 warning Setting locale failed
I was getting the error from all kinds of Linux programs about "setting locale failed". For example, running Perl gave me the following output:
 user@machine:~$ perl --version
 perl: warning: Setting locale failed.
 perl: warning: Please check that your locale settings:
 	LANGUAGE = (unset),
 	LC_ALL = (unset),
 	LC_CTYPE = "UTF-8",
 	LANG = "en_US.UTF-8"
     are supported and installed on your system.
 perl: warning: Falling back to the standard locale ("C").
The easy solution
If you're running Debian Linux or some derivative, you may also see the following warning when you run some command:
Warning: locale not supported by C library, locale unchanged
The solution is to install all locales:
$ sudo apt-get install locales-all
Continuing
If the above didn't help, or isn't applicable, continue.
What it comes down to, is that I was using SSH from my MacBook (running OS X Mountain Lion 10.8.3) to log into my Debian Linux server (running Squeeze).
Apparently, after logging remotely into Linux, the SSH client sets the LC_CTYPE environment variable to the same value as OS X. This conflicts with the LANG environment variable that Debian sets by default. That's because under Linux, the LANG is an overarcing variable, from which others, like LC_CTYPE, can be derived. That wouldn't be a problem, except the LC_CTYPE variable its contents are differently formatted under OS X and Linux.
The warning says that it's "falling back to the standard locale". That means nothing will be translated, and only ASCII will be used when printing characters. No unicode support, I guess?
The irritating warning can be removed with a small change on the Linux side, by unsetting the LC_CTYPE in your .bashrc. Add the following line:
unset LC_CTYPE
However, this gave me problems when using SVN from the Macbook; whenever I'd do some remote action, I'd get something like the following:
 user@macbook:trunk$ svn log --limit 1
 svnserve: warning: cannot set LC_CTYPE locale
 svnserve: warning: environment variable LC_CTYPE is UTF-8
 svnserve: warning: please check that your locale name is correct
Thus alternatively, you can fix this with a similar change on the OS X side, by adding the following two lines to .bash_profile:
 unset LC_CTYPE
 export LANG="en_US.UTF-8"
Instead of unsetting LC_CTYPE, you can also go to the Terminal app its preferences, open the Settings tab, select your profile on the left side, go to the Advanced tab, and uncheck "Set locale variables on startup".
2013-03-13 Minimize cellular usage on iPhone
There's a number of guides on the internet that talk about minimizing cellular usage. Often, they go into generalities, like "don't watch streaming video". Well, duh. I'm not going to offer general tips, but instead list a few settings for the iOS and some popular apps so your iPhone (or iPad) prefers WiFi whenever possible.
In the Settings app:
- iTunes & App Stores -> Use Cellular Data -> OFF
- iCloud -> (several settings) -> OFF
- Mail, Contacts, Calendar -> Fetch New Data -> Manually
- Music -> iTunes Match -> OFF
- Music -> Lyrics & Podcast Info -> OFF
- iBooks -> Sync Bookmarks -> OFF
Separate apps:
- Podcasts: do not use this app; it has a setting to only use WiFi, but seems to have a bug in this feature
- Instapaper: tap Settings -> Advanced -> Update -> On Wi-Fi Only
- Evernote: tap Evernote icon -> tap username -> General Settings -> Sync on WiFi only
There's some things I'm not sure whether they use cellular data, but I'm listing them here:
- In the Settings app: General -> About -> Diagnostics & Usage -> Don't Send
Edit: there's a much better, much longer list here:
TidBITS: What’s Behind Mysterious Cellular Data Usage in iOS 6?
TidBITS: Mysterious iOS 6 Cellular Data Usage: A Deeper Look
2013-03-05 Forcibly drain your cellphone battery
If you want to forcibly drain your iPhone battery for some reason, first configure the display. Turn off the auto-lock, set the auto-brightness off and manually turn up the brightness to 100%.
Then go and warm up that little CPU by running a JavaScript benchmark, either with SunSpider if it's already pretty empty. Or go ahead and release the Kraken, which is a heavier test.
2013-01-07 Onward flight not checked-in
When flying internationally with multiple legs, I've ran into the situation where I'd use the web check-in but get the error message:
Onward flight not checked-in. [HR 2606]
The possible reason is, that you're trying to check in too early. So although you might be able to check in for the first leg, you're too early for the second leg.
This situation had me stumped twice, until I realised the above reason is what might go wrong. The error message is not very helpful of course, so I'm hoping this is the actual reason, and documenting for everyone else. Here's hoping Google finds this.